Credit Checker Post Installation Guide
We offer free installation and setup for our prospects and customers. Please email us at solutions@cloudmaveninc.com for further assistance.
1. Admin Setup:
- Login to your Salesforce org where the package is installed.
- Go to the “Admin Setup Console ” tab. You can search for the tab or go to the credit checker application. Please read the instructions to complete the easy setup steps.
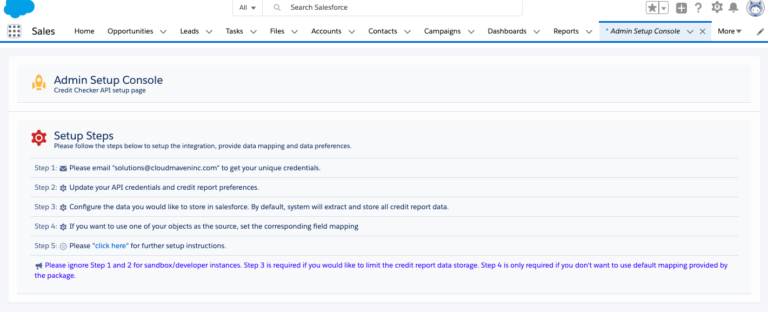
- Step 1: Please email “solutions@cloudmaveninc.com” to get your unique credentials for test and production.
- Step 2: Click on the Gear Icon to update your API credentials and Credit report preferences.
- Step 3: Configure the data you would like to store in Salesforce. By default, the system will extract and store all credit report data.
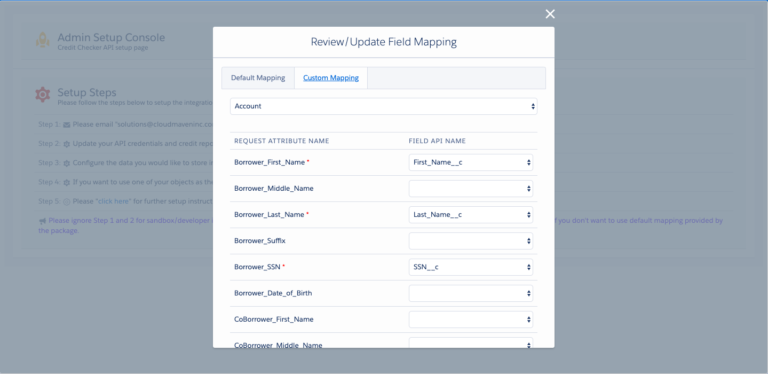
- Step 4: If you want to use one of your objects as the source, Set the corresponding field mapping.
Note:
Step 3 is required only if you would like to limit the credit report data storage.
Step 4 is only required if you don’t want to use default mapping provided by the package.
2. Required Fields:
We need the following fields to pull the credit report from the credit bureaus. Please make sure you have these fields on your source object:
- First Name
- Last Name
- Social Security Number ( For customers who doesn’t want to use the SSN number. They can simply provide 000-00-0000)
- Street Address
- Zip/Postal Code
- State Code – ISO Code.
- Country Code.
Create a new field “Run Credit Report” checkbox on the source object. This field will be used to validate when to run the credit report.
2.1 Lookup field:
Create a new field “Run Credit If your source object is different than Account, Opportunity, Lead & Contact. Please create a lookup field on the “Credit Report” object and make your source object as a parent. Report” checkbox on the source object. This field will be used to validate when to run the credit report.
3. Validation Rule
Please add a validation rule on the source object to ensure that required fields to run the credit report is present when the user is checking the “Run Credit Report” checkbox. Please change the fields as per your org configuration.
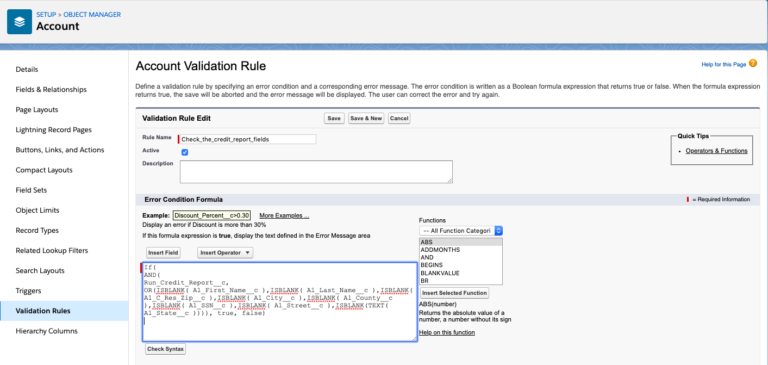
3.1 Validation Rule for Contact:
If( AND
( Run_Credit_Report__c, OR(ISBLANK(FirstName), ISBLANK(LastName), ISBLANK(MailingCity), ISBLANK(MailingCountry), ISBLANK(M
ailingPostalCode),ISBLANK(Text(MailingStateCode)),
ISBLANK(Social_Security_Number__c), ISBLANK(MailingStreet))), true, false)
3.2 Validation Rule for Accounts:
If( AND
Run_Credit_Report__c, OR(ISBLANK(FirstName), ISBLANK(LastName), ISBLANK(BillingCity), ISBLANK(BillingCountry), ISBLANK(Billin
gPostalCode), ISBLANK(Text(BillingStateCode)),
ISBLANK(Social_Security_Number__c), ISBLANK(BillingStreet))), true, false)
3.3 Validation Rule for Leads:
If( AND
Run_Credit_Report__c, OR(ISBLANK(FirstName), ISBLANK(LastName), ISBLANK(BillingCity), ISBLANK(Country), ISBLANK(PostalCode)
,ISBLANK(Text(StateCode)), ISBLANK(Social_Security_Number__c),
ISBLANK(Street))), true, false)
3.4 Message:
Required fields missing on the related contact. Please Populate First Name, Last Name, Social Security and Full Mailing Address.
4. Automating Credit Run:
- In this step, we are going to create a process builder on your source object(lead, Contact, Opportunity, Account or any other custom object). Using this step, the system will automatically create and run the credit report.
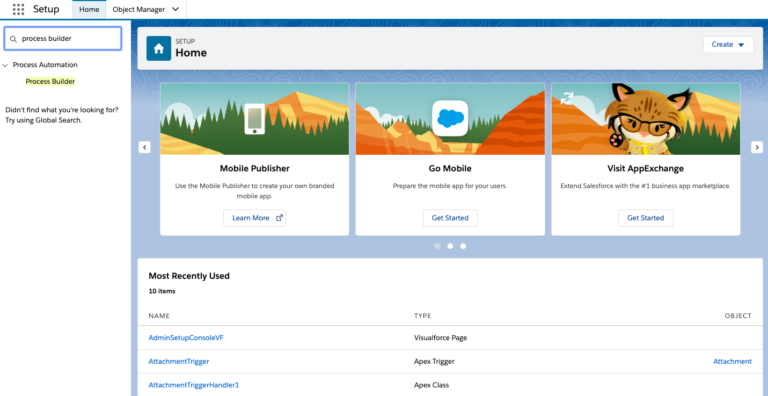
- Go to Setup >> Search for process builder in Quick Find Box.
- In this step, we are going to create a process builder
- on your source object(lead, Contact, Opportunity, Account or any other custom object). Using this step, the system will automatically create and run the credit report.
- Go to Setup >> Search for process builder in Quick Find Box.
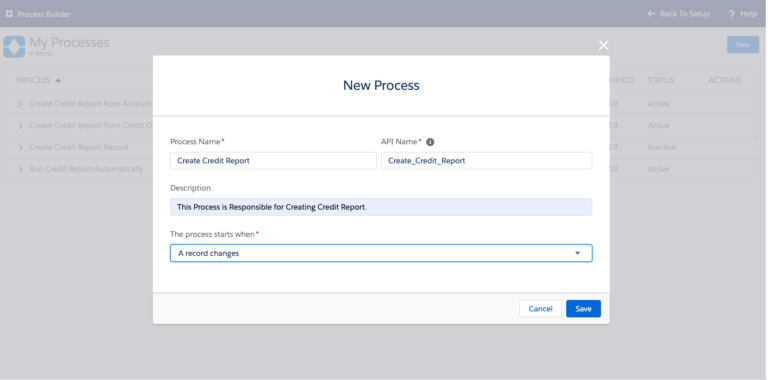
4.1 Process to Create Credit Report:
- Enter the Process Name (Process name can be anything, set it according to your preference) Ex: Create Credit Report.
- API Name
- Description
- The process starts when Identifies when the process begins. Select when “A record changes”.
- See image for reference.***
- Click on Save
4.1.1 Adding Object for Run Credit Process:
- Click add an object( Object from where you want to run your Credit Reports)
- Start the process select “when a record is created or edited”.
- Click on save.

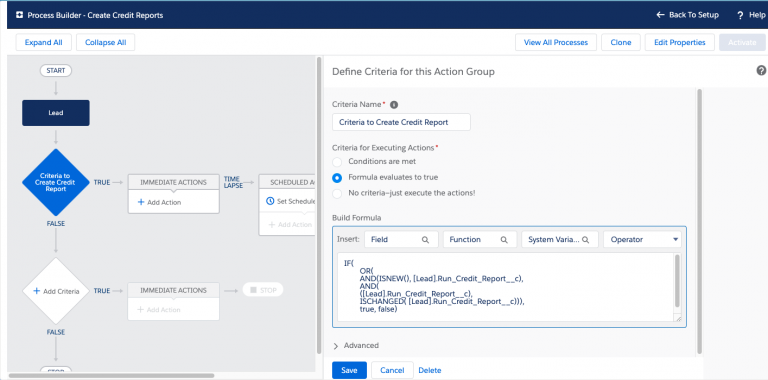
4.1.2 Adding Criteria for Run Credit Process.
- Provide a Trigger Name(Name is according to your choice and preference).
- Add “Criteria for Executing Actions” – always select Formula Evaluates to True option. Provide the formula for evaluation, We recommend using an ID or other fields that uniquely identifies records so the process can pick exactly one record.
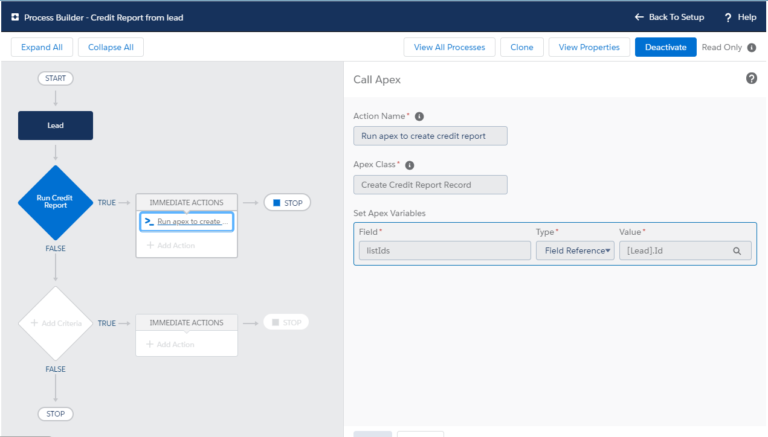
4.1.3 Defining Actions for Run Credit Process:
- Action Type – “Select Apex“.
- Action Name – Provide a unique name.
- Apex Class – Select “Create Credit Report Record“
- Set Apex Variables.
- Select – “Add Rows“.
- Field – Select “listIds“.
- Type – Select field reference.
- Value – Select source object Id field.
- Click on the “Activate” button to activate the flow.
5. Automating Credit Pull:
In this step, we are going to create another Process Builder on Credit Report Object . Using this process, the system will automatically pull the Credit Report.
From Setup>> enter process builder in the Quick Find box and select process builder.
Click New
5.1 Setting Up Process Builder
- Process Name( Name the process according to your preference) like “Automatically run a credit report”.
- Provide API Name.
- Description
- This process starts when “A record changes”.
- Click add an object. Select “Credit Report”.
- Start the process select “when a record is created or edited”.
- Refer to the image below for reference.
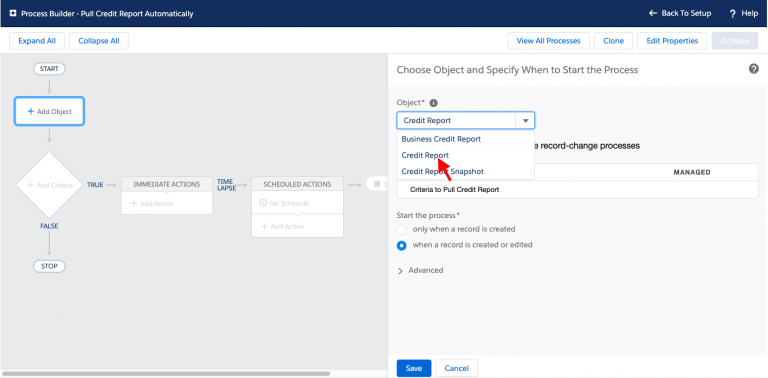
5.1.1 Adding Object for Credit Pull Process:
- Click add an object select “Credit Report”.
- Start the process when the record is created or edited.
- Click Save.
5.1.2 Adding Criteria for Credit Pull Process:
- Provide a Trigger Name
- Add “Matching Conditions” – always select “Conditions are met” option.
- Provide Condition.
- Field – Status
- Operator – Equals
- Type – Picklist
- Value – Not Requested.
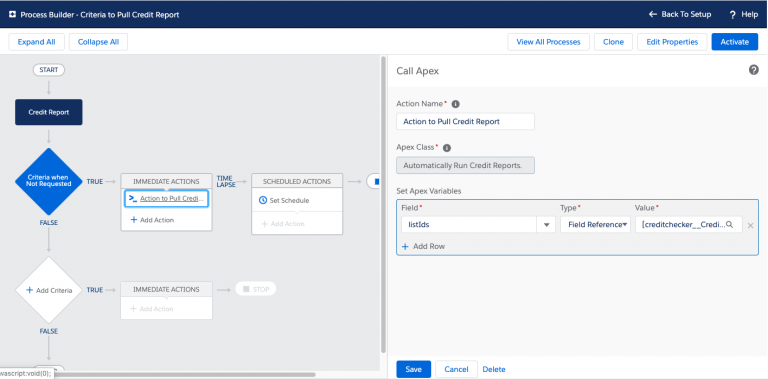
5.1.3 Defining Action for Credit Pull Process.

- Action Type – “Select Apex”
- Action Name – Provide a unique name
- Apex Class – Select “Automatically Run Credit Reports”
- Set Apex Variables
- Select “Add Rows”
- Field – Select “listIds”
- Type – Select field reference.
- Value – Select object Id Field.
- See the screenshot for reference.
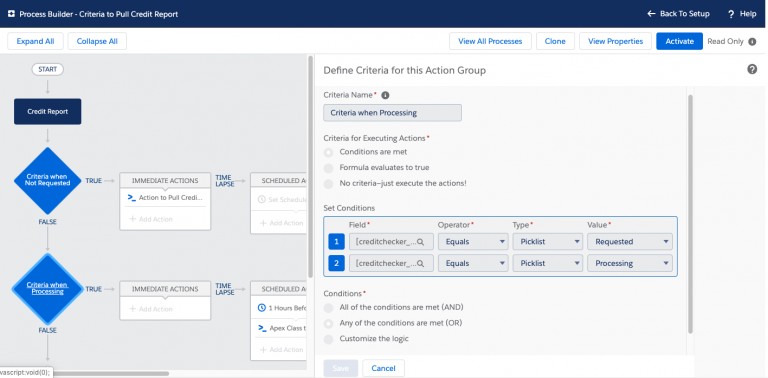
5.1.4 Another Criteria for Credit Pull Process:
- Provide Trigger Name
- Add “Matching Conditions” -always select “Conditions are met” option.
- Provide the conditions.
- Status = “Processing” OR status= “Requesting”
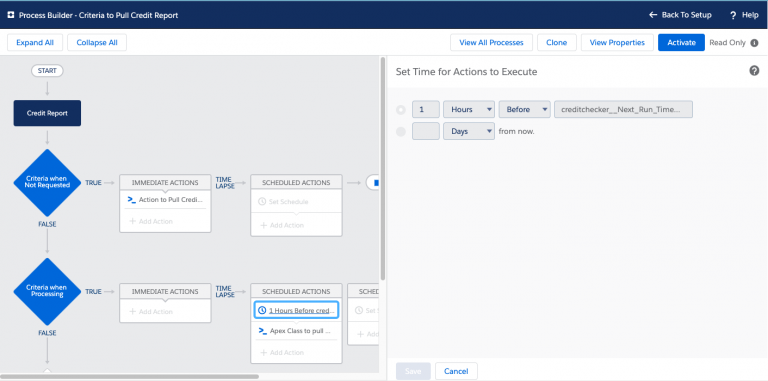
5.1.5 Scheduled Action for Credit Pull Process:
Select 1 hour before the “Next Run Time” field.
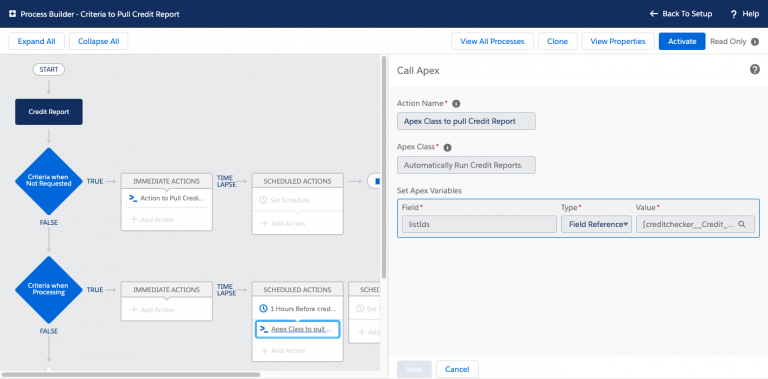
5.1.6 Scheduled Action:
- Action Type – “Select Apex”
- Action Name – Provide a unique name.
- Apex Class – Select “Automatically Run Credit Reports.”
- Set Apex Variables
- Select “Add Rows”
- Field – Select “listIds”
- Type – Select field reference.
- Value – Select the Id field.
6. Credit Checker App permission
Assign the following permission set to the desired users. This is required for the users to run and see the credit reports.
- Credit Checker App – Individual & Joint Report
- Credit Checker For Admin – Only assign to super admin who can change the configuration setting.
7. Use Test Vs Production Data
By default, the application is pointing towards the Test server. Use the below navigation to change the custom settings to point your Salesforce instance to the “Production” server. Setup>>Custom settings>>Select “Common Setting”>>Manage>>Appinstance
- Use “Test” to point to test server.
- Use “Production” to point to the production server. This value should be a set of live/production credit check.
If you have any queries please write to us at solutions@cloudmaveninc.com


